"Sweetness and Light"
"The pursuit of perfection, then, is the pursuit of sweetness and light." -- Matthew Arnold, Culture and Anarchy, 1882.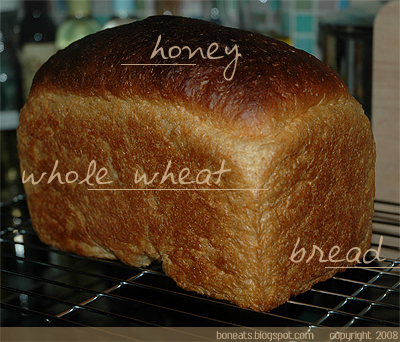
Ok, so when Samuel Johnson, and then Matthew Arnold talked about "sweetness and light," they probably weren't thinking along the lines of bread-making, but the concept of achieve a perfect loaf of a bread (or rather, an almost perfect loaf of bread) seems to be based on the same idea here. It was another bread-baking day today, and I decided to go the healthy route and make some whole-wheat loaves for a change. I usually prefer to eat whole-grain breads because of the greater health benefits it offers as opposed to white bread, but I've had difficulty in making wholte-wheat bread in the past, which was disheartening to say the least. My WW breads used to turn out dark and dense with an almost rancid-flavour to it, which I suspect has something to do with my whole-wheat flour itself. However, ever since I've been baking bread on a regular basis since last year, I've come to realise that I tend to get a much nicer WW bread or part-WW if it had a sponge or poolish to start off the bread. I still don't quite understand the chemistry behind it, nor will I pretend to, but something about the fermentation process helps mellow out the rancid flavour, and the liquid also helps to soften the wheat grains, which I think helps in yielding a softer, lighter bread.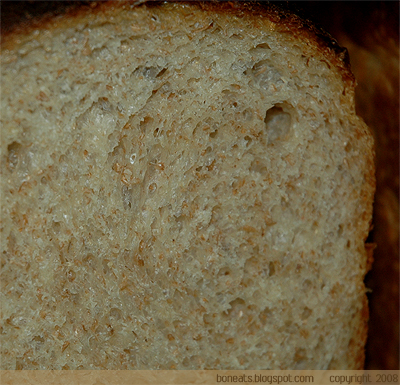
So gone are the days of dense bread after I came across a recipe for Honey Whole Wheat Bread. I've had great success in the past with breads using dairy products, and was intrigued with this recipe since it used evaporated milk (although it did state that you can use other milk products, milk powder or even water if you're a vegan). I really do love the addition of milk products in my breads now, especially if it is going to be a sandwich loaf, because it really does add moisture to the bread and help lock in that delicious moistness for a few more days.
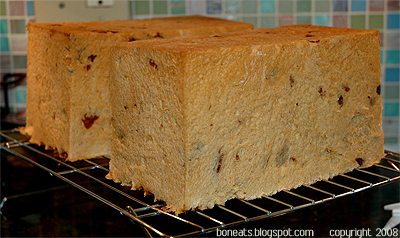
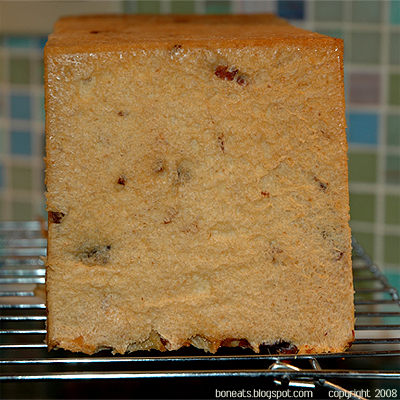
My loaves rose beautifully; I ended up baking them in my Pullman pans because the sides were higher, but I left the lids off. They smelled delicious while baking, and when I took them out of the pans, they were perfectly golden brown. The top does brown quite fast (depends on how hot your oven runs, really), so I did cover it with some foil halfway through the baking time. And I was delighted to find that the bread, when cut, had a very soft, moist and light(!!!) crumb, without the rancid flavour! The honey adds a nice subtle sweetness to the bread without overpowering it. This bread would make a delicious sandwich, and I can only imagine what a lovely morning I'll have tomorrow when I toast a slice of this up and drizzle some honey on top!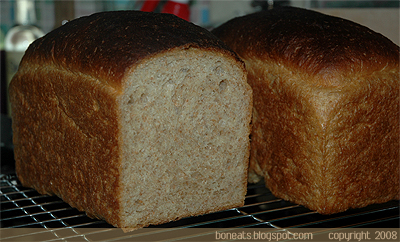
Honey Whole Wheat Bread
Adapted from this recipe
Makes two 9" x 5" loaves
1 lb whole wheat flour (about 3 1/2 cups)
12 oz hot water
8 ounces bread or all-purpose flour (about 1 1/2 cups)
1 5 oz can evaporated milk, warmed (105° to 115°F)
1/3 cup honey
2 teaspoons salt
3 teaspoons dry active yeast
3 1/2 teaspoons vital wheat gluten (optional)
Additional 1/2-1 cup flour, as necessary, to achieve the desired consistency
Mix the hot water and whole wheat flour together in a bowl. Cover the bowl with plastic and set aside until around room temperature, at least 1 hour.
In a separate bowl, pour 1 tablespoon of the honey into the warm milk and stir to combine. Sprinkle over the yeast and let sit for about 10 minutes. Add the yeast mixture to the whole wheat flour mixture, along with the rest of the honey, salt and vital wheat gluten. Mix for about 1 minute until well incorporated. Add bread flour, 1/2 cup at a time, untill the dough comes together and starts to come away from the sides.
Switch from the paddle to the dough hook, and machine-knead for about 15-18 minutes, adding additional flour as kneaded, until you have a tacky (but not completely sticky) dough. Alternatively, you can hand-knead at this point. Place the dough in a large, well-oiled bowl, cover with plastic wrap, and set aside to rise for 1 1/2 to 2 hours, or until doubled in size.
Divide the dough in two and shape the loaves. Place the loaves in greased 9 x 5 loaf pans, cover the pans loosely with plastic or tea towel, and set aside to rise again for 90 minutes.
Preheat the oven to 425°F. Place the loaves into the oven and immediately reduce the oven temperature to 375°. Bake for about 45 to 50 minutes, rotating the pans halfway so that they brown evenly, until the internal temperature of the loaves is around 190 degrees and the bottom of the loaf sounds hollow when tapped. If the top browns too quickly, cover with aluminum foil. Allow to rest on a wire rack for 15 minutes before removing from pans to let cool completely.