Wednesday, December 17, 2008

Lost in Paradise in the Midst of a Storm

dec17_01 copy

While I’m immersed in the cold and snow upon my arrival back home for the holidays, my mind is elsewhere, lost in a warm, tropical paradise—coconut paradise, to be exact. I made macaroons the other day, and eating them reminded me why I love them so much. It also made me wonder why I haven’t made them at any other time throughout the year, since they take no time to make and only use 4 ingredients, all of which I always have in my pantry.

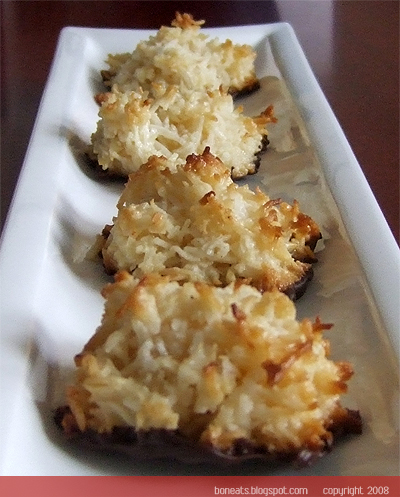
If you’re a fan of coconut, I seriously urge you to give these a try if you haven’t already. The recipe calls for condensed milk, which gives the macaroons both their sweetness and divine chewiness. I like using unsweetened coconut so that my macaroons don’t become cloyingly sweet (the condensed milk will make them sweet enough, trust me!), and the addition of the almond extract gives the macaroons a nice, nutty hint working in the background. Dipping them in chocolate not only makes them look pretty and gift-ready, but they also balance the sweetness of the coconut beautifully.

I’ve tried a version using egg whites once, and it had nothing against these ones. The egg white versions just don’t yield the same kind of texture and chewiness that is so distinct and so beloved in a coconut macaroon (at least in my coconut macaroons). Best of all, the condensed milk version is so simple. All you need is a bowl, a spoon and baking sheets and you’ll instantly have macaroons on your table. These are delicious and addictive, so if you plan to give them away, it’s best to keep them hidden from family members!

dec17_02 copy

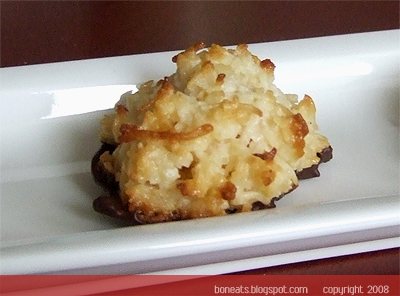
Chewy Coconut Macaroons
Makes about 3 to 4 dozen, depending on the size

6 cups unsweetened shredded coconut
1 300-ml can condensed milk
2 tsp pure vanilla extract
1 ½ tsp pure almond extract
¾ to 1 cup semisweet chocolate chips (optional)

Preheat the oven to 325°F. If your baking sheets aren’t nonstick, line them with parchment paper and set aside.

In a large bowl, combine the condensed milk, vanilla extract and almond extract. Stir until well combined.

Add in the coconut and stir until everything is incorporated, and all the coconut is moist and coated with the condensed milk.

Using a dessertspoon, place heaping, rounded spoonfuls of the coconut mixture onto the baking sheets.

Bake in the oven for 10 to 12 minutes, or until golden-brown around the edges. Remove immediately and let cool completely on cooling racks.

In a double boiler, melt the chocolate chips. Dip the bottom of each macaroon in the chocolate, using a small palette knife to help smooth the surface by scraping off the excess chocolate. Place on a baking sheet or a cooling rack, inverted, to allow the chocolate to cool and set completely, at room temperature.

Monday, December 15, 2008

Spicing Up The Vegan Factor

dec15_01 copy

I mentioned them yesterday in my Holiday Cookie Extravaganza round-up. Now here’s the recipe for the Vegan Spiced Molasses cookies.

This was my first time baking something vegan. It seemed a little strange, not to be using butter or eggs this time around, and having never baked anything vegan before, I was worried about the end results. Would they end up dry? Would they be too bland? Thankfully, my worries were quickly laid to rest not long after these came out of the oven. The outside had the familiar crunchiness from the sugar coating, while the inside was still warm and soft—just the way I love my ginger cookies!

The recipe is actually a mash-up of three different ginger cookie recipes. With a little tweaking here and experimenting there, I came up with a formula that I think I would be happy to make again. I’ll definitely keep this recipe on file, for those days when I’m craving cookies but have no eggs in the fridge, or to satisfy my vegan friends.

dec15_02 copy

Vegan Spiced Molasses Cookies
Makes about 3 dozen

½ cup vegetable oil
1 heaping tbsp freshly grated ginger
2 cups all-purpose flour
1 tsp baking soda
¼ tsp salt
2 tbsp ground ginger
1 tsp cinnamon
½ tsp allspice
¼ tsp ground cloves
¼ tsp ground nutmeg
1 tbsp cocoa powder
¾ cup brown sugar, packed
¼ cup molasses
¼ cup water (or soymilk)
1 tsp vanilla extract
¼ cup granulated sugar, for coating.

Preheat the oven to 350°F. If your baking sheets aren’t nonstick, line with parchment paper. Set aside.

In a large bowl, sift together all the dry ingredients except for the brown sugar and granulated sugar. Set aside.

In another bowl, beat the oil, brown sugar, and freshly grated ginger with an electric mixer, about 2 to 3 minutes. Slowly beat in the molasses, water (or soymilk) and vanilla extract until everything is well incorporated, about 2 minutes.

Add the dry ingredients into the wet ingredients and with the mixer on low, mix everything together until just incorporated. Wrap the bowl tightly with plastic wrap and refrigerate for at least 30 minutes. **

Shape the dough into 1-inch balls and dip in the granulated sugar. Place on the baking sheet, leaving a space of 2 inches between each cookie to allow room for spreading. Flatten the balls slightly with your fingers—the thinner they are, the crispier they will be. Bake in the oven for about 10 minutes. Remove and let cool on cooling racks.

** I like to refrigerate my ginger cookie dough, as it makes the dough less of a sticky mess when I go to roll them into balls. If you’re in a hurry though, you can skip this step. Just make sure you have a bowl of water next to you to keep your hands wet; this will help with the sticky factor.


Want to eat cookies too? Go to Food Blogga to find out how, and don't forget to find out what everyone else is baking (and most certainly eating!).

Sunday, December 14, 2008

Holiday Cookie Extravaganza 2008

dec14_02 copy

Christmas is inarguably my favourite time of the year (as with most people). The holiday cheer, the (corny) holiday music, the holiday spirit…what’s not to love? Best of all, the holiday season means I get to give my inner baker a really good workout. With two large buckets each of flour and sugar, six bars of butter (that’s 12 cups!), almost three dozen eggs and various spices and sprinkles, I was ready to take on this year’s baking extravaganza.

This year’s first batch of holiday cookies consisted of nine varieties. As I had to accommodate some of the people in my class who had allergies, it meant that most of the cookies in this batch were nut-free. It was hard to narrow down my choices, since a lot of my best (and favourite) cookies contain nuts, but I managed to dig up some nut-free favourites, as well as try my hand at a few new recipes.

dec14_03 copy

The first set is the cookies featuring nuts. As always, I had to include biscotti in my batch of holiday cookies. To go with the holiday theme, I decided to make Cranberry Pistachio biscotti, which are so beautiful with the green of the nuts and the red of the berries playing off the paleness of the dough. These make wonderful gifts on their own if you dip them in some melted white chocolate, and drizzle a little milk chocolate on top, as I did. The other nut cookie in the batch was another favourite of mine, Rugelach, this time using my own homemade apricot jam and using dried blueberries (I mistakenly took the blueberries to be currants).

dec14_04 copy

The next pair of cookies plays off another traditional holiday flavour: gingerbread. One of them is my personal favourite, Martha’s Chewy Chocolate Ginger, which I recommend everyone should try. It will quickly become your family’s favourite, I assure you! The second ginger cookie (I like to call them Vegan Spiced Molasses) was actually made for my Secret Santa person in my class. As she was a vegan, I kind of mashed together a cookie dough from three different non-vegan recipes and prayed for the best. Luckily, they did turn out. I had some leftover cookies, and I can happily eat these ones and feel slightly less guilty eating them!

dec14_05 copy

The third set of cookies highlights butter. I made melt-in-your-mouth Shortbread, Raspberry Thumbprints and the classic Sugar cookie. I never really decorated my sugar cookies in the past; the most I ever did last year was to get my friends to stick various candy and sprinkles on the cookies before I popped them in the oven. As I flipped through Martha Stewart’s Holiday issue this year, however, I was especially drawn to her perfectly iced sugar cookies (but when are Martha Stewart’s things not perfectly done?!). I made Royal Icing the traditional way with egg whites and what not, but if you’re looking to save time (or just want to stay away from raw eggs), it’s best to get some meringue powder. Because I used egg whites, my royal icing came out a bit stiffer than I would have liked to ice cookies with, and I didn’t achieve the same pretty marbling effects that taunted me from the very pages of MS. The decorating was lots of fun though, allowing me to feed off my creative juices for two hours. Plus I must admit, I’d rather decorate cookies any day than study for exams!

dec14_06 copy

The last set of cookies was an ode to all chocolate lovers out there. I actually had the recipe for the Black and White Chocolate Chunk with Cherries for a few years now, but didn’t get around to making them until this year. They were just as delicious as I imagined them to be when I first saw the recipe, with the sweetness of white chocolate balancing the dark richness of the chocolate and the slight tartness of the cherries. As for the Chocolate Malt cookies (a Doris Greenspan recipe), they didn’t turned out as I thought they would (but not in a bad way!. I thought there would be some slight crunch to them, but these are incredibly moist—almost brownie-like in texture. Packed full of cocoa, chocolate-malt powder, chocolate chips, and Maltesers, they are the perfect cookies for any chocolate fan.

So, countless number of cups of sugar, flour, two dozen eggs and many pounds of butter later, I was surrounded by about 300 cookies. What to do, when a girl with a insatiable sweet tooth is surrounded by that many cookies? Pack them up of course! Santa would be happy that I was good this year, staying away from the majority of the cookies (I did set aside the rejects for myself though) and wrapped them as prettily as I could in plastic treat bags or cookie tins and festive ribbon. Then off I went to spread some holiday cheer. People often ask me why I bake so much, to which I respond with various answers like “I like to bake” or “It’s a stress-reliever.” But the biggest thrill I get is that I can bring a smile to someone’s face with just simple little act of giving a cookie or a slice of cake. And isn’t giving someone a temporary piece of happiness, no matter how fleeting it is, an amazing feeling? Because it’s so true what they say, that the best way to win someone’s heart is through his or her tummy.

dec14_01 copy

Friday, December 12, 2008

Leftovers Made Easy

dec12_01 copy

As I mentioned yesterday, leftover caponata makes for a fantastic base for pasta sauce. This is my bastardized version of pasta alla puttanesca, considering the traditional recipe has no signs of eggplant whatsoever. Simply heat some oil, smashed garlic, red pepper flakes and an anchovy fillet in the pan until fragrant, toss in one chopped tomato and cook for about 2 to 3 minutes, or until the tomato starts to become soft. Throw in a couple of tablespoons of the leftover caponata and toss until heated through. I also splashed in some white wine and some heavy cream, along with some leftover edamame I had sitting around in the fridge. Throw in your cooked pasta of choice and toss until coated. You have dinner on the table in minutes! This dish may not be your traditional puttanesca, but it’s still fast, cheap, and easy!

Thursday, December 11, 2008

Tilapia Two Ways

Fast and easy cooking continues this week. I think my body is still recovering from writing my feature article, so it hasn’t been very happy with me when I put heavy things into it. Plus with all the baking I’ve done the past week, I just don’t want to spend another hour slaving away in the kitchen merely to feed myself. By the end the last batch of cookies for the day are out of the oven, I just want to sprawl out on chair and not have to even worry about making dinner.
dec11_01 copy

I made two tilapia dishes this week. Partly because it’s pretty fast to prepare after I’ve defrosted it from my freezer the night before; partly because I needed a break from tofu and soup. Tilapia is a fish with a really mild flavour, so if you’re not a big fan of fish but would like to start eating more fish, this is a good choice. It also has a firm texture, akin to cod (although cod is more flakier), making it really easy to handle, and ensuring that it won’t flake out on you (pun so intended!) while cooking.

The first version was simply dredging the fillet in a mixture of cornmeal, dried parsley (if you have fresh parsley, even better!), salt, pepper, and some finely grated lemon zest and Parmiggiano-Reggiano cheese. I pan-fried it for about three minutes on each side. The cornmeal crust gives the fish a great crunchy exterior, and the herbs, lemon zest and parmesan flavours the fish really nicely. I served them with a side of roasted root vegetables: carrots, parsnips and beets roasted with olive oil, salt, pepper, and cumin, and drizzled with a honey-balsamic glaze.

dec11_03 copy

The second version was just as easy. The fish was dredged in a bit of flour, seasoned with salt and pepper, and pan-fried like above. I served that on a bed of caponata. Well, more like a bastardized version of caponata, since I’m pretty sure every nonna out there would cringe at my method of making the eggplant “stew.” Best of all, caponata tastes fabulous all on its own, or tossed with your favourite pasta.

Sunday, December 7, 2008

The 20 Minute Stew

Twenty minutes. Take that Rachael. Having been through four years of undergrad, I know how precious time can be. I had little time to eat, let alone sleep, and I would even occasionally find myself scheduling in bathroom breaks. As one can imagine then, meal times were far from being intricate and thrilling. I often gave myself a time limit of 15 minutes or so to get a meal on the table. Anything longer than that, and I would be wasting precious studying time. Thus, I owe a lot of hungry days to soup. I could easily get miso soup ready in less than 10 minutes (with the help of instant dashi—I’m cheating, I know!). All I had to do was boil water, chop up some green onions, tofu and nori sheets, mix in some miso and voilĂ ! Dinner was ready.

dec05_02 copy

However, watching Korean dramas during my procrastination sessions recently made me suddenly crave for something spicy and savoury. Kimchi jjigae, a spicy Korean stew made with kimchi, green onions, onions, tofu, and sometimes seafood or pork, is quite a common dish in Korea. It’s a hearty homestyle meal that is often shared communally at the centre of the table amongst family or friends, served with steamed white rice and numerous banchan (Korean side dishes). Traditional recipes suggest you use older fermented kimchi because they have more flavour.

Kimchi is a traditional dish of Korea (I'd even say it's one of their national dishes). It's basically vegetables that have been fermented in a spice mixture. The most common kimchi variety is the Chinese cabbage variety, but there are many more to choose from, including radishes, chives, cucumber and perilla leaves. Interestingly enough, it's also said to be one of the healthiest things to eat. Besides being low on calories, reports show that one serving of the stuff can provide up to 80% of one's daily required amount of vitamin C and carotene! It also contains numerous lactic acid bacteria, the good bacteria that you can also find in yogurt.

My version of kimchi jjigae is far from being authentic at all. After sifting through various recipes, it seems like most recipes include making the broth out of kelp (dried seaweed) and dried anchovies, both of which I did not have in my pantry. Other recipes call for clams. I found a really easy recipe for kimchi jjigae over at My Korean Kitchen as a working basis. Like any homestyle recipe, I personally think its best to tweak it to your own personal tastes. Homestyle cooking is the essence of comfort food, and if you can’t even enjoy what you’re eating, then why bother? Bacon adds a nice smoky depth to the stew, while anchovies makes it more savoury and rich. I also play around with whatever vegetables I have sitting in the fridge at the time. It’s an incredibly flexible recipe that will take own a different flavour each time you make it, depending on what you put into it, but that’s the joy of making this dish. More importantly, the spicy kick really warms the soul, perfect for a day like today, when it’s –20°C outside!

dec05_01 copy

And on a side note, don’t you love my personal-size clay pot? It’s adorable, isn’t it? I picked it up for $10! Picked it up at Utsuwa-No-Yakata (“House of Pottery”), a store that specializes in beautiful Japanese tableware, including gorgeous ceramics and pottery. I often frequent this store, and if you’re lucky, you’ll come across one of their frequent sales, a great chance to pick up some great finds for a steal.

Kimchi Jjigae (Kimchi Stew)
Adapted from My Korean Kitchen
Serves 1 to 2 people

2 anchovy fillets (optional)
1 large handful of kimchi
½ small onion
¼ block silken or regular tofu (from a 400 g block)
1 stalk green onion
1 small handful king oyster mushrooms
1 small bunch enoki mushrooms
1 large leaf napa cabbage, thinly sliced (optional)
200 ml chicken stock

For the sauce (mix together):
1 to 2 tsp Korean chilli powder **
1 tsp Gochujang
2 tsp soy sauce
Pinch of ground black pepper
¼ tsp sugar

Thinly slice the onion and green onion. Chop the kimchi and king oyster mushrooms and napa cabbage (if using) into bite-size pieces. Cut the tofu into small cubes.

Preheat some vegetable oil in a wok over medium heat. Add the kimchi, and stir until fragrant and heated through. Remove and set aside.

Preheat a small, heavy-bottom pot over medium heat. Add the anchovies and stir until most of it has melted down. Add any meat you might be using to the bottom of the pot. Place on top all the other ingredients (kimchi, napa, onion, tofu, chicken stock and sauce) except for the green onion.

Raise the heat to medium-high and bring the pot to a boil. Allow to simmer for 5 minutes, or until the vegetables are tender. Stir occasionally to make sure the sauce gets into the stock evenly.

Remove from heat and sprinkle green onions on top. Serve immediately with steamed white rice.

** Start with the smaller portion first and adjust to your own taste.

Wednesday, December 3, 2008

Let the holiday baking begin...

dec02_01 copy

Don’t you just love this time of year? The chill in the air, the twinkling lights and sparkly tinsel, carols on the repeat mode… Yes, Christmas has got to be the best time of the year. I’m always excited when I see the first signs of Christmas decorations go up in the malls some time in November, and it’s always a feat to try to hold out whipping my Christmas music stash until after Remembrance Day. But it’s officially December now, and I’m officially in my Christmas celebration mode.

To say that this past week has been a nightmare would be a bit of an understatement. School has been sucking up my life with loads of assignments, and it wasn’t until yesterday that I finally handed in my two major projects that have been stressing me out lately. That said, I’ve had little time to sleep these past few weeks, let alone cook, which explains the slowdown in updates around here. Day after day of miso soup just isn’t very thrilling to blog about, don’t you think?

With my assignments handed in, I needed a bit of a celebratory/therapy baking session. Surprisingly, there are quite a few cupcake fans amongst my publishing peers. In the past, I’ve had lots of cookie fans, and a few cheesecake fans. Seldom did I make cupcakes back in Western though, mostly because there wasn’t an outright demand for them, and also because my classes were so small that I would still be left with a dozen cupcakes sitting on my counter (a dangerous situation for a gal who already has a bad enough sweet tooth!).

These cupcakes almost never happened. My plan to make these Chocolate Mint Cupcakes (from Cupcake Bakeshop) was almost spoiled last week when a friend in the same class told me she was going to make chocolate mint cupcakes as well. For the past week, I had desperately searched high and low for another awe-inspiring cupcake recipe, but alas, I decided to make these anyway. I had been eyeing this recipe for quite some time, and with the holiday season fast upon us, I thought it would be a perfect time for me to finally try them out.

Instead of using the Rich Chocolate Cupcake recipe for these, I reverted to my favourite chocolate cupcake recipe. This cupcake recipe produces an incredibly rich chocolate cake with the perfect crumb—not too dense, but not too light so that it wouldn’t be able to support fillings and toppings. They’re also incredibly moist, and make for a wonderful treat just on their own (preferably with a tall, cold glass of milk!). Trust me, these cupcakes will change your life. And if you’ve always been a cake-mix person, I dare you to go back to the boxed thing after trying these.

dec02_02 copy

I loved the chocolate-mint ganache filling. It adds a nice, elegant touch to the cupcake, and makes for a nice surprise to the unsuspected. I followed the suggestion and used fresh mint. You can really tell that it’s fresh mint being used when you bite into the ganache centre. The mint flavour is considerably different—much fresher and almost grassy tasting. I did add a bit more chopped mint to the chocolate ganache than suggested, as well as a few drops of peppermint extract to help boost the mint flavour against the dark chocolate (I really love a more pronounced mint presence in chocolate since I adore the combination so much). I think next time, I’ll make chocolate mint truffles using this method.

As for my icing, I tried to do a really cool two-toned effect with red and white. Alas, my piping skills are still lacking, and the entire experiment failed miserably, resulting in extremely pink (!!) cupcakes. Not very Christmasy. And might I add, for the record, how incredibly impossible it is to find regular candy canes nowadays? I tried a number of different stores yesterday, and none of them had regular peppermint candy canes in stock. How ridiculous is that? There went my plans of decorating my cupcakes with crushed candy cane. Instead, I stuck pieces of After Eight chocolate sticks into the cupcake. But if anyone spots candy canes anywhere, let me know. Maybe I need to stock up on them…

dec02_03 copy

I’m quite happy how these turned out in the end, except for the ugliness of them with my bad piping and pink frosting and all. However, they were delicious and quite satisfying. Then again, give me anything with chocolate and mint combined and I’m a pretty happy camper! So here’s three cheers to the official start of holiday baking 2008!

  © Blogger templates 'Neuronic' by Ourblogtemplates.com 2008

Back to TOP