Wednesday, November 19, 2008

Bar Mercurio

Everyone has their one favourite hangout that really speaks to them. My recent fave hangout ever since I’ve moved to Toronto is Bar Mercurio, a really cute and quaint café right in the St. George campus of University of Toronto. I was first introduced to the place by my former professor, and we always meet up for coffee at this joint. Furthermore, it’s located right in the English building, so it’s definitely a restaurant made just for a literary nerd like myself.

What I love about the place is how small it is. Granted, some may think it’s cramped, with the tables pushed very close together. Noise level skyrockets when the dinner rush is in full swing. Despite all that, it still gives off a warm, cozy, intimate feel, reminiscent of those European cafés and bistros. The décor harkens back to European bars and bistros of the ‘40s and ‘50s, with a slight Old-World feel. The biggest highlight though is the open kitchen, situated at the back of the restaurant. Patrons have a full view of the two chefs at work, and the minute you walk into the door, you’re greeted with delicious smells wafting over from the kitchen.

nov19_01 copy

nov19_03 copy

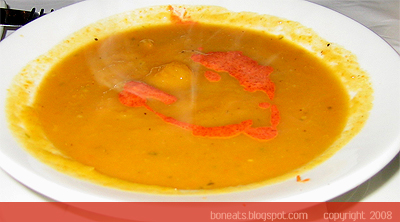
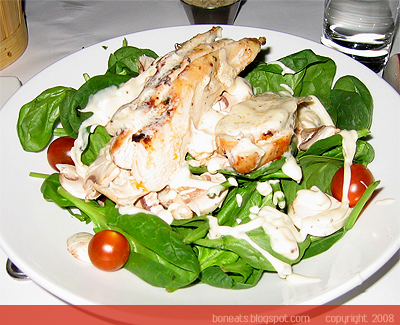
After a lovely evening spent with George, I was absolutely famished. Dinner started off a bit slow. The appetizers took forever to get to our table (perhaps I was just really hungry, but even my brother agreed that the appetizers longer than normal), and I ended up stuffing my face with foccaccia (a bad idea). The bread was a bit on the chewy side, but the accompanying tuscan bean dip was quite nice. Finally our appetizers came after much waiting and anticipating. I ordered the purée of sweet potato soup. It wasn’t completely pureed; some of the sweet potatoes were left in small pieces, along with bits of shredded chicken, adding a nice textural element to the soup. The soup was nicely balanced in flavour as well (not too sweet!) with a little kick to it from the cayenne pepper. My brother, meanwhile, ordered the baby spinach salad with seared chicken breast, red grapes, mushrooms and gorgonzola dressing.

nov19_02 copy

nov19_04 copy

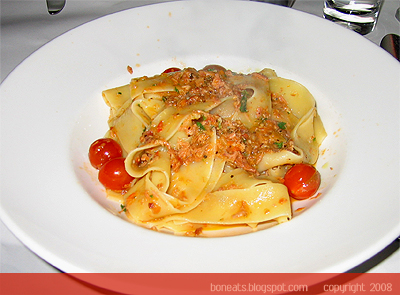
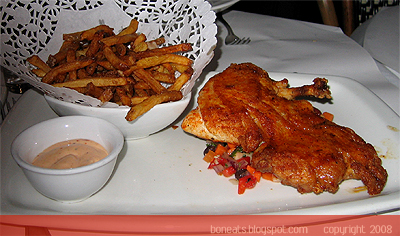
Not long afterwards, our main courses arrived. Despite my suggestions for him to try Mercurio’s ginormous pizza, he opted for the pappardelle with duck ragu, while I ended up with the roasted crispy & honey-glazed capon breast, served on top of a mixed bean and vegetable salad, and house fries with a smoky chipotle aioli. The capon was beautifully cooked; juicy and tender on the inside, with an incredibly crispy skin. The honey glaze adds just enough sweetness to the dish to get the taste buds excited.

I was a little disappointed with the service last night though. Usually the wait-staff (and you do get to know them over time) is pretty attentive. I can’t put all the blame on them for the slow service; the kitchen was slow in dishing out our appetizers. And perhaps because we were tucked away in the corner, we were out of their radar. But on the whole, the food was delicious, the waiters are really friendly, and you just can’t beat the atmosphere in the restaurant. If you go, be sure to make reservations. The restaurant gets packed on most nights, and it’s impossible to get a table on the weekends without one (unless you want to dine at the bar). Lastly, please do try their amaretto cheesecake. It is a slice of heaven. I always order it whenever I come to Mercurio, along with a cup of americano (one of the best coffee you’ll find in town). I ended up taking my piece of cake home with me last night so that I can have a little midnight indulgence.

Name: Bar Mercurio
Address: 270 Bloor St. W.
Cuisine: Italian
Price Rating: Entrees $15-26
Accessible: No

Wednesday, November 12, 2008

Pizza Party, The Lazy Way

nov12_01 copy

I’ve been craving some homemade pizza for some time now, but didn’t want to go through the trouble of actually making everything from scratch (ah, the lazy bum in me is starting to come out at this time of the year). I went to St. Lawrence Market on Saturday morning again, and picked up some lovely produce and ingredients to make gourmet pizzas. There’s so much to choose from during the autumn harvest, but I decided to make three different kinds of pizzas: Hawaiian, Margherita, and Caramelized Onions with Eggplant, Roasted Red Pepper and Artichoke.

My favourite kind of pizza as a kid was Hawaiian. I loved the combination of sweet and savoury (I still do), with the chunky pieces of juicy pineapple, salty ham and loads and loads of gooey mozzarella cheese. As I’ve grown older, and my tastebuds have grown more sophisticated, I’ve come to love gourmet pizzas with unique toppings. Perhaps my favourite gourmet pizza so far is one made at Vittoria Trattoria, a wonderful Italian restaurant in Ottawa’s Byward Market. Their Salmon pizza features apple wood smoked salmon, mozzarella cheese, braised leeks, fresh tomatoes and their to-die-for mascarpone dill sauce. It is simply divine!

nov12_02 copy

The Margherita pizza is a classic in the Italian pizza canon. Originating from Naples, Italy, and named after Margherita of Savoy in the 1880s, the pizza Margherita is perhaps the easiest pizza to assemble, after the four-cheese pizza (Quattro formaggi). The traditional ingredients of the pizza Margherita are fresh basil, slices of fresh tomatoes, olive oil, sea salt, garlic, and slices of fresh mozzarella. My version is slightly different, in that I skipped the garlic, and I used a thin layer of tomato paste to allow my toppings to stick to the crust, since I was using Stonemill’s multigrain pita breads instead of actual pizza dough as my base.

With the Hawaiian pizza, I had picked up some lovely glazed oven-roasted back bacon, which in my opinion, is kind of like a cross between bacon and ham. Roughly chopped, I sprinkled the bacon over the pizza “crusts” that had been spread with some tomato paste, and then sprinkled some drained crushed pineapple on top, before topping it off with mozzarella cheese.

nov12_03 copy

The last pizza was perhaps my favourite of the three. I caramelized 4 small onions with some thyme, spread them over the crusts, and topped them off with sliced roasted red pepper, chopped marinated artichoke hearts and sliced baby eggplants which had been brushed with some olive oil and balsamic vinegar. I then sprinkled some goat cheese on top, and finished it with a good dose of leftover Italian cheese mix I had lying around in the fridge. The flavours on this one were incredible. You had the sweetness of the onions contrasting with the slight tartness of the eggplant (thanks to the balsamic) and artichoke hearts, and the tanginess of the goat cheese.

So it is easy to make pizza when you’re strapped for time. You can do it my way and simply pick up some lovely Greek-style pitas, which make perfectly great pizza crusts. Or you can go to your local deli or pizza parlour and see if they sell frozen pizza dough, which also makes a great alternative.

Wednesday, November 5, 2008

Simple Pleasures

nov5_01 copy

I made pancakes again over the weekend. I can’t help myself. Pancakes are just pure love. How can you not love digging into a big, fluffy pile drizzled with maple syrup on a lazy Sunday morning? I dare you to pass on a plate. Pancakes also make great comfort food when you’re recovering from a crazy (but fun) weekend.

I had some leftover pumpkin puree from the cupcakes, enough to put them into my pancake recipe and make delicious Spiced Pumpkin Pancakes. I used buttermilk pancakes as the base, and simply added the pumpkin puree and the spices. Pancakes were absolutely heavenly; so light and fluffy, with a hint of pumpkin and spices that’ll warm anyone’s heart on a cool autumn morning. Don’t forget the maple syrup!

nov5_02 copy

Spiced Pumpkin Pancakes
Makes 10 to 12 pancakes

1 cup buttermilk
½ cup whole wheat flour
½ cup all-purpose flour
3 tbsp light brown sugar
½ tsp baking powder
½ tsp baking soda
¼ tsp salt
½ tsp ground cinnamon
¼ tsp ground nutmeg
¼ tsp ground clove
¼ tsp ground ginger
½ cup canned pumpkin puree
1 large egg
1 ½ tbsp vegetable oil

In a large bowl, combine the flours, sugar, baking powder, baking soda, salt, cinnamon, nutmeg, clove and ginger.

In a separate large mixing bowl, whisk together the egg, vegetable and buttermilk. Add the pumpkin puree and whisk until incorporated. Slowly add the dry ingredients to the wet ingredients. Gently stir together until just incorporated and still lumpy. Don’t overmix. Allowing the batter to be lumpy makes for fluffier pancakes. Set aside for 10 to 15 minutes.

Heat some vegetable oil a large nonstick skillet over medium heat. Working in batches, add about a ¼ of batter to the pan; cook until golden brown and tiny air bubbles form evenly on top, about 2 minutes per side. Transfer to a place and keep warm in the oven (heated at 200°F) while you cook the remaining pancakes.
Serve pancakes with maple syrup.

Sunday, November 2, 2008

Dipping Days

nov2_01 copy

When a Milestone's opened up right by my place in London, ON last year, I used to love going there for two things on their menu (ok, make that three if we’re counting the bellini): 1) their California Spring Salad, and 2) their Hot Spinach and Artichoke Dip. The dip was…unbelievably good. It had the perfect creamy texture to it, and unlike so many places, didn’t have an overpowering cream cheese taste to it. Needless to say, it was delicious, and that was one of the reasons I kept going back to Milestone’s.

I haven’t been to Milestone’s since I’ve moved away from London. Granted, I’ve never been to a Milestone’s before the one right beside my apartment complex opened, and I probably won’t go to a Milestone’s any time soon when they were countless other great, non-chain restaurants to choose from in Toronto. However, I find myself missing their dip from time to time. With a friend hosting a “Pretentious Games Party” last night, I thought it would be the perfect finger food to bring along to the party.

nov2_02 copy

I used frozen chopped spinach; if you want to go all out and use fresh spinach, then be my guest. I just think that you’ll save yourself a lot of trouble and work by buying a package of the pre-chopped stuff. And try to use marinated artichokes rather than the canned variety; the seasoned ones are more tasty, and they’ll add an extra boost of flavour to the dip.

This recipe is really just using your instincts and your own tastes. It’s really all up to how you like your dip. Add more mayonnaise and/or cream cheese to make it creamier, add more cheese if you’re a cheese-lover like me, or add more lemon juice for a dip with a bit more tang. You can even try using different cheeses—I used a blend of 4 Italian cheeses, but an aged white Cheddar cheese or Gruyère would be just as lovely. Or if you want the gooey cheesiness but not the pungent flavour, stick with the reliable mozzarella. Just be sure to use good-quality cheese, because that will make all the difference.

nov2_03 copy

Hot Spinach & Artichoke Dip
Serves 8 to 10 as an appetizer

1 10-oz package frozen spinach, thawed and squeezed of its excess water
1 14-oz jar marinated artichoke hearts, drained, squeezed of its excess water, and finely chopped 1 cup grated cheese (a blend of four Italian cheeses works really well)
2 cloves garlic, finely chopped
1 cup plus 2 heaping tbsp mayonnaise
3 heaping tbsp cream cheese, softened
Squeeze of lemon juice, to taste
Freshly ground black pepper, to taste
Extra cheese, for sprinkling on top

Combine all the ingredients in a bowl, and allow to sit in the fridge for a few hours to allow the flavours to come together.

When ready to serve, pour the dip into an ovenproof dish and sprinkle over the extra cheese. Bake at 400°F for 20 minutes, or until heated through and the cheese is bubbling and lightly golden brown.

Serve with tortilla chips, crackers, pita or bread.

Saturday, November 1, 2008

Chocolate and Caramel, Oh My!

nov01_01 copy

Perhaps it’s not the smartest thing to be blogging while still recovering from last night’s Halloween festivities. Good times were had, and my body is absolutely furious with me today after consuming far too much candy and drinks for my own good. Thank goodness Halloween only happens once a year…

Back in the day, around Halloween, these little creamy caramel candies would pop up around the house. They were square, individually wrapped in clear wrapper, and were always kept in this large, glass jar. I loved those things: incredibly sweet with a hint of vanilla, super chewy with a rich, milky creaminess to them. They were to die for, besides the fact that they were absolutely dangerous to the teeth, since they stuck to them afterwards (ah, the joys of caramel!). I never saw them around the house any other time of the year, and as my brother and I grew older, they disappeared from our lives completely.

It wasn’t until last year that I bought a bunch of these caramels and fell in love with them again. Granted, I don’t often eat them because of their high sugar content. But whenever I need a quick sugar fix and a little pick-me-up, one of these caramels is really satisfying. Last Halloween, I ended up using these caramels to make Chocolate Caramel Thumbprints.

nov01_02 copy

I thought that this year, it would be fun to make Chocolate Caramel Cupcakes instead, since I was already on the cupcake wagon this week. The chocolate cupcakes are based on the recipe over at Cupcake Bakeshop. It’s a super easy recipe that yields incredibly decadent cupcakes with a deeply rich chocolate flavour. What I simply did was cut a bit of the top off, filled it with some of the melted cupcakes, and placed the tops back on before frosting them.

While last night was a blur, I think the cupcakes turned out to be a hit. At least no one threw a cupcake at me in disgust!

Chocolate Caramel Cupcakes with Chocolate Buttercream
Adapted from Cupcake Bakeshop by Chockylit
Makes 24

3/4 cup butter, at room temperature
1 1/2 cups sugar
3 eggs, at room temperature
2 cups flour
1 tsp baking soda
1/2 tsp salt
3/4 cup Dutch-processed cocoa powder
2 tbsp instant espresso powder
1 1/2 cups milk, at room temperature
2 tsp vanilla extract

For the caramel filling
25 creamy caramel candies, unwrapped
2 1/2 tbsp milk

For the chocolate buttercream
3/4 cup butter, at room temperature
3/4 cup Dutch-processed cocoa powder, sifted
2 1/2 cups confectioners' sugar, sifted
1/3 cup milk
1/2 tsp vanilla extract
1/2 tsp instant espresso powder

Preheat the oven to 350°F.

In a bowl, beat the butter with a hand mixer until softened (you can also make these with a stand mixer using the paddle attachment). Add the sugar, and beat until light and fluffy, about 3 minutes. Add the eggs, one at a time, beating for 30 seconds after each addition. Add the vanilla and beat to combine.

In a separate bowl, sift together the flour, baking soda, salt, cocoa powder, and espresso powder.

Add about a third of the dry ingredients to the wet ingredients and beat until just incorporated. Add about half of the milk and beat to combine. Continue adding, alternating between the flour and milk, and finishing with the flour. Do not overbeat!

Spoon the batter into prepared muffin tins about three-quarters full. Bake in the centre of the oven for about 25-30 minutes, or until a cake tester comes out clean. Cool completely on cooling racks.

For the caramel filling: Place the caramel candies and milk in a medium microwaveable bowl. Melt in the microwave on MEDIUM for 2 minutes, or until the caramels are completely melted. Stir through, and let cool a bit before filling the cupcakes.

For the chocolate buttercream: Beat the butter on high for 30 seconds. Add the cocoa and 1 cup of sugar, and beat until incorporated (don't worry if it looks dry). Add half of the milk, the vanilla extract, the instant espresso powder, and the remainder of the sugar, and beat until incorporated. Continue to add milk until you get the consistency you desire.

To assemble the cupcakes: Using a knife, cut a circle at the top of the cupcake and poke it out, so that you'll have a lid. Fill the cupcake with a heaping dessert spoon of the melted caramel, and place the lid back on top of the cupcake, pressing it down a bit. Frost the cupcake with the chocolate buttercream, and decorate with sprinkles or candies, if desired. Repeat with the remaining cupcakes.

  © Blogger templates 'Neuronic' by Ourblogtemplates.com 2008

Back to TOP