Thursday, September 25, 2008

Stuffed Bell Peppers with Fish Paste

This dish can often be found at Chinese restaurants on the dim sum cart: pieces of green pepper stuffed with a smooth but springy shrimp paste, and lathered in a black bean sauce. During my vacation in Hong Kong a few years ago, I came to love this dish, as my aunt would make this dish with fish paste rather than shrimp paste, and rather than in green peppers, stuffed them into mild chilli peppers that gave the dish a nice (but not too over-powering) kick.

What's so great about this dish is how easy it is to put together when you have some pre-made fish paste and black bean sauce on hand. Granted, if won't taste as delicious if you take the effort to make your own fish or shrimp paste (because everything tastes better when it's made from scratch!), it is a good substitution when you're in a pinch. Pre-made fish paste can be found in most Asian grocers, in the fridge aisle and probably hanging out with the various different kinds of fish balls, cuttlefish balls and beef balls.

sept25_01 copy

You can go the traditional root if you want and use green peppers, but I love using the colourful sweet bell peppers since the sweetness of the vegetable makes for a lovely contrast to the savouriness of the fish paste and sauce. Feel free to use whatever peppers that fit your fancy; you can ever use mild chilli peppers if you'd like. I used mini bell peppers, but if you are using the normal-sized ones, cut them into quarters and then each quarter in half again horizontally. This will give you a total of 8 little pepper "bowls" from each pepper to hold the fish paste.

Before you stuff the peppers, coat the inside of the peppers with some cornstarch, which will help the paste stick to the peppers. Heat a little oil over medium heat in a wok or a nonstick frying pan and pan-fry the stuffed peppers fish paste-side down first. Pan-fry until golden and crispy, about 6 to 8 minutes; flip the peppers and cook for another 5 to 7 minutes. Remove the peppers from the pan and set aside.

sept25_02 copy

Add about a tablespoon of oil into the still-hot pan and add 1 heaping tablespoon of black bean and garlic sauce. Sprinkle in 2 to 4 teaspoons sugar (adjust according to your own tastes), a pinch of freshly ground black pepper and a splash of light soy sauce. Add in a tablespoon or two of water and allow to simmer for 1 to 2 minutes. Put the peppers back into the pan, stir to coat the peppers in sauce, cover and allow the peppers to simmer for another 4 to 5 minutes in the sauce.

Super easy and super fast, this dish is delicious with steamed white rice and some Chinese vegetables on the side.

Tuesday, September 23, 2008

Mapo Tofu

When I mention Chinese food, most of my friends automatically think of spring rolls, wonton soup, honey garlic ribs and the oh-so-coveted chicken balls, smothered in the bright red, almost gelatinous sweet and sour sauce (which, might I add, is so not Chinese food!). But much like France, Italy and even America, where cuisine is divided up by the different regions, China has eight main regional cuisines, also known as the Eight Great Traditions. The most common and perhaps the most popular of the eight amongst North American palates is Cantonese cuisine, which is often milder in taste compared to the others.

sept22_01 copy

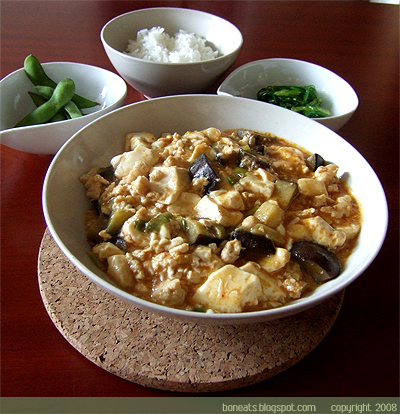
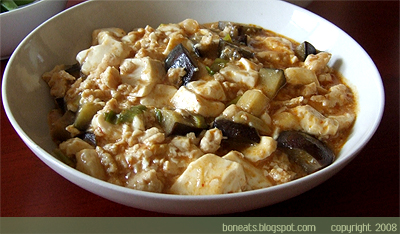
A few of the Eight Great Traditions do feature lots of spices and chilies, like Hunan or Sichuan (or more commonly known as Szechuan here in N.A.) cuisines. These two are known for its liberal use of the hot stuff, often serving up dishes that are bright red from the chilies used. While I'm not the biggest fan of Sichuan cuisine, mostly because it is far too spicy for me, I do love their Mapo Tofu: soft, silky bean curd, ground meat (typically pork or beef), simmered together in a deliciously fragrant hot bean paste sauce. Because the dish is so overpowering in flavour and spiciness (taking on the "mala" characteristic, which roughly translates into "numbing spiciness" (in that it is so spicy it'll numb your whole mouth), it is best enjoyed with a simple bowl of steamed white rice.

I must admit, my version is a bit of a cheater's version to the traditional Mapo Tofu. Traditional recipes call for spicy dou ban jiang, a spicy and salty paste made from fermented broad beans, soybeans, red chili peppers and spices. However, I don't have any dou ban jiang in my pantry, and I didn't bother picking up any from the Asian grocers since I knew I wouldn't use it all the time. A trick my mother taught me was to substitute miso for the dou ban jiang, which is similar in taste (miso is typically fermented soybeans). The only thing to remember is that if you use miso, you'll also need to add chili sauce to give the dish it's signature spicy kick!

This is a really easy dish to throw together, and a great way to use up a block of tofu that’s sitting in your fridge. Be sure to use silken tofu; it's the best tofu to use for mapo tofu because it has such a soft, silky texture that'll melt in your mouth, and it really helps offset some of that heat. You can add other vegetables if you so desire, like water chestnuts for a bit of contrast in texture. I happened to have a baby eggplant lying around in my fridge, so I threw that in, and it makes for such a great combination with the spicy sauce and silky tofu. The choice of meat is also flexible; for something leaner, I chose chicken, but you can also do turkey, beef or the more traditional pork. Basically, have fun with this recipe! Once you've got the logistics of it, you can make your own changes to make it your own signature dish.

sept22_02 copy

Mapo Tofu
Serves 4 if part of a multi-course meal; 2 to 3 as main dish

1 package silken tofu (about 450 g)
6 ounces ground chicken (or meat of your choice)
1 tsp Chinese cooking wine (rice wine)
1 tsp light soy sauce
Pinch of sugar
Pinch of black pepper
1 tsp cornstarch
1 tsp sesame oil
2 cloves garlic, minced **
2 spring onions, sliced 1-inch long on the diagonal
2 tbsp miso
1 tbsp chili sauce, or to taste
1 to 2 tsp sugar
1/2 cup reduced-sodium chicken stock
1 to 2 tbsp cornstarch solution

Gently remove the beancurd from its package and wrap in a clean tea towel. Place on a plate, and using heavy plates or a heavy wooden chopping block, place on top of the tofu for about half an hour. This process will press out some of the water in the tofu, as silken tofu has the highest content of water. (If you want, you can skip this step.) Once drained, cut tofu into 1-inch cubes and set aside.

Meanwhile, marinate the ground chicken with 1 tsp light soy sauce, 1 tsp of cooking wine, a pinch each of sugar and pepper, 1 tsp cornstarch, 1 tbsp water and 1 tsp sesame oil. Mix until combined, and leave for 30 minutes.

In a separate, small bowl, stir together the miso, chili sauce and 1 to 2 tsp sugar. Adjust the amount of chili sauce and sugar according to your own tastes. (I like to add a bit of water or stock at this point to loosen up the sauce a bit. This is up to you, as you can always add a bit more stock later on in the cooking process.)

Heat oil in a wok over medium-high heat. Add the ground chicken and stir-fry until it is just about cooked through. Reduce the heat to medium, add the minced garlic and sliced spring onions and stir-fry until fragrant. Add the miso-chili sauce mixture and stir-fry for about 1 minute.

Pour in the stock and stir well. Mix in the drained tofu and gently push the ingredients in the wok back and forth to prevent the tofu from breaking apart. Adjust seasonings, if desired. Simmer for about 5 minutes. Add in the cornstarch mixture in slowly, allowing the sauce to come to a boil so that it can thicken (don't add more than you need, or the sauce will be too thick!). Garnish with sliced spring onions, if desired, and serve immediately with steamed rice white.

** A great trick I use to avoid having my hands smell like garlic for days is to use a fine grater to grate my garlic right into the wok, rather than having to mince the garlic by hand. It's much faster, and your fingers will thank you!

Saturday, September 20, 2008

All Grown Up

june05_01 copy

If I were ever to write a cookbook one day, it would probably feature recipes of delicious sweet treats with the adult palate in mind. Ginger would be one of the featured flavours. As a kid, I didn't like ginger, and thus I was not a fan of ginger cookies either. My brother and I used to painstakingly pick out the slivers of ginger in our mom's stir-fries. However, all grown up now, my palate has become more sophisticated and I have come to love ginger. I throw it in my cooking whenever I have a chance, and I love the subtle spiciness it adds to baked goods.

Since I'm in Martha-loving mood of late, I'll continue my praise for her this week. These cookies have been my current favourite for the past few months. I used to use a recipe from my brother for ginger cookies. They were pretty good, with a sugary crisp exterior, and if under-baked just a little, a little soft and chewy on the inside. It was my go-to ginger cookie recipe for the past few years until I came across this recipe a few months back for Chewy Chocolate Ginger Cookies. The word "chocolate" was enough to have me curious, but the combination of chocolate and ginger sounded so delightful to my ears that this recipe became a must-try.

june05_02 copy

Despite the addition of chocolate, this is the perfect "adult" cookie with the addition of different spices, like all spice, cinnamon and of course, ground ginger. A little bit of cocoa is also added to heighten the chocolate flavour of the cookie, and to round out the flavours. The best part is the addition of some grated fresh ginger, which really brings the cookies up a few notches in flavour, and adds an extra kick of spiciness to the cookie. If you really want to make this an ultimate cookie for adults, replace the chocolate chips with candied ginger, which would go just as well with these superbly decadent gems.

I dare anyone who makes these cookies to try to keep away from these, because it's practically impossible. The molasses and the chocolate chips make these cookies soft and chewy, super decadent and oh-so-gooey when it's fresh out of the oven. A great addition to your winter holiday repertoire, these make for a great treat any day of the year really.

Sunday, September 14, 2008

Oh Martha!

Is anyone out there like me, and has a rather difficult relationship with Martha? Granted, regardless of her track record in the finance world and the many rumours of her having little to no people skills, I can't help but continue to admire this formidable woman. She is the one and only Martha Stewart after all. I grew up watching her shows on TV, with all the "good things" that she made in and out of the kitchen. Believe or not, I even thought that it would be cool to be just like Martha one day...

sept14_01 copy

Granted, I have much less ambitious goals nowadays. Gone are the days of wanting to be the next Martha Stewart. However, I'm still fascinated by the woman, and the empire she has built for herself. But as admirable (or unadmirable, whatever your opinions of Martha & co. may be) as she is, the same can't always be said for her recipes. They are either truly a good thing, or they fail miserably, leaving me frustrated both at myself and at Martha.

Thus, it's always testy waters whenever I decide to tackle a Martha recipe. Thankfully, the last few recipes I've made from her collection have turned out rather well, and Martha is back in my good graces. I've stumbled across her recipe for the Black-Bottom Coconut Bars a couple of times on her website, but didn't get around to making them until the other day. The bars are very easy to make, requiring only a few ingredients that are readily available in most bakers' kitchens.

sept14_02 copy

The bars are a cross between a rich, chocolate brownie and a chewy coconut macaroon. The combination of the two is simply divine. I did make an alteration to the recipe, substituting unsweetened flaked coconut for the sweetened stuff. It'll make the bars much less cloyingly sweet, as I imagine it will be if you decide to stick with the sweetened coconut, but the choice is up to you. Be sure not to overbake these, like any brownie recipe you'd follow, or the bars will turn out dry and crumbly—definitely not what you're after! These bars are the perfect little pick-me-ups in the afternoon, and make for a fuss-free after-dinner treat.

Wednesday, September 10, 2008

Under the Tuscan Sponge

sept10_03 copy

Growing up as a kid, my parents would often pack my brother and I into the car for the 4-hour drive down to Toronto. It was a "....occurence", since we often came down to Toronto, and so, I've become quite familiar with the GTA area over the years. I loved Toronto! I used to always pester my dad (half-jokingly, half-seriously) about moving down to Toronto, where there was always something to do, always something to see, and more importantly, always something delicious to eat. Now that I find myself living in the T-do, however, I often ask myself, "What have I gotten into?" When you have so many great restaurants only steps away from you, it's hard to sometimes find the motivation to go home and make something yourself, especially after a long day.

sept10_01 copy

And so I found myself in such a dilemma yesterday. It was my mother's birthday, and while I would have loved nothing more than to bake her a cake myself, it just made life much easier to go out a buy her a cake from one of the many fabulous bakeries in the city. We used to love the cakes from Senses at their Bayview location until it closed down. After trying out their downtown location earlier this summer as part of the annual Summerlicious event in Toronto, we discovered that the pastries were still of high caliber. Went back yesterday to pick up Tuscany, a beautiful cake composed of hazelnut sponge, marzipan and rich chocolate ganache, with an equally beautiful, captivating name.

sept10_02 copy

What I loved about this cake was the hazelnut sponge; the nuts add a nice texture to the cake, giving it a little bite here, a bit of crunch there. The cake was absolutely divine and not too sweet. I'll definitely want to go back and try out one of their cheesecakes or mousse cakes one day. And that, my friends, is why I'm in such a dilemma. Yes, it's great to live in a city that is has so many endless, gastronomic opportunities, but it's not too friendly on the wallet, or on the waistline...

Sunday, September 7, 2008

Curry In A Jar

As you can tell by the lack of updates around here lately, things in my life have been a bit hectic. With my move to Toronto and the start of a new school year, I've been busy running around the city, unpacking and just getting myself back into the rigid routines of school life. That's not the only reason; unfortunately, I'm still without internet at home (sigh...), which also accounts for my lack of updates. But rest assured, it's not because I've disappeared or have given up on this blog. That is far from the case! It's just that updates will be slow in the coming weeks with the busy schedule and the lack of internet.

sept07_01 copy

Being in Toronto, I'm now fortunate to be steps away from many great produces and specialty stores. Toronto is home to one of the most popular and famous farmer's market in Canada, St. Lawrence Market. Open every Saturday starting at 5 am, the market features many different stalls of vegetables, baked goods, meat and poultry and other specialty goods, all locally grown and raised. Thai curry is so simple to make when you're starting with with a pre-made paste. Granted, it's the "cheater's" way, and it certainly won't be as delicious if you made your own curry paste from scratch. But it's a great alternative, and also a great idea to keep a jar of ready-made curry paste on hand in your cupboard for an easy, quick-fix meal that'll be ready in minutes.

With all the vegetables I picked up at the market, I decided to put together a quick supper of Thai Red Curry with the vegetables that I bought, along with some beautiful jumbo shrimps. I simmered a can of coconut milk with 2 tablespoons of red curry paste (feel free to use green curry paste if you prefer that!) for about 10 minutes, adding cauliflower, carrots, zucchini and red peppers during the cooking process, along with two bay leaves. When the vegetables were just about done, I added the jumbo shrimps for the last five minutes of cooking. Right before serving, sprinkle it with some chopped coriander and Thai basil leaves (or regular basil), if preferred, and serve with steamed rice.

sept07_02 copy

What I love about curry is its versatility. You can take just about anything you have lying in your fridge and throw it into a curry. It can be completely vegetarian, with loads of fresh veggies, chickpeas or tofu, or you can use a variety of different meats like beef, pork, chicken, fish and seafood. Curry paste is also great to have on hand to make a great sauce, or to marinate meats for grilling or baking. If you do decide to go the ready-made paste route though, try to find a brand that is reliable and a bit more authentic. I used the Thai Kitchen brand, a product from Thailand, and the flavours were quite similar to some of the Thai curries I would have eating out. They're easily available at any supermarket now, so take a look the next time you're out grocery shopping!

  © Blogger templates 'Neuronic' by Ourblogtemplates.com 2008

Back to TOP