Saturday, October 31, 2009

Move Over Spinach…

oct31_01 copy

A thought occurred to be when I stepped into the door and stared at treasures I had brought home from the market—What the heck am I going to do with all this Swiss chard? Ironically, it was my first time cooking with and eating Swiss chard. Imagine the horrors of it if I hated it.

What made me bring home so much Swiss chard in the first place was all thanks to the November 2007 issue of Cooking Light. I came across a recipe for an Italian White Bean and Spinach Soup, which looked delicious—something warm and cozy that I can bring to work for lunch. But it was past prime spinach season, so I decided to substitute Swiss chard for the spinach, and here is where my story all began.

The soup comes together very quickly, and is chock full of wonderful veggies. The addition of the shiitake mushrooms adds complexity to the flavours, giving it a rich, earthy tone. I recently rediscovered my red chilli flakes in my cupboard, so add a dash if you like a little kick. And this soup can easily be made more substantial by adding some pancetta, bacon or smoky chorizo sausage.

oct31_02 copy

Swiss Chard and Bean Soup
Adapted from Cooking Light, November 2007
Serves 6


1 ounce dried shiitake mushrooms
2 cups cold water
1 tbsp olive oil
1 cup chopped yellow onion
2 cloves garlic, minced
½ tsp red chilli flakes (optional)
4 cups packed fresh Swiss chard, chopped
1 tsp fresh thyme leaves
1 16-ounce can Romano beans, or other white beans, rinsed and drained
1 14-ounce can organic vegetable or chicken broth
Fresh thyme, for garnish (optional)
Red pepper flakes, for garnish (optional)
Freshly ground black pepper, to taste

Combine mushrooms and 2 cups cold water in a bowl; cover and let stand for at least 2 hours. Remove mushrooms from the water, squeezing as much excess liquid out of them as possible and reserving the liquid. Reserve the stems. Chop mushrooms and set aside.

Heat olive oil in a large nonstick saucepan over medium-high heat. Add onion, garlic, red chilli flakes and mushrooms (including the stems); sauté 5 minutes or until tender. Add the reserved mushroom liquid, Swiss chard, thyme, beans, and broth. Bring to a boil. Cover, reduce heat, and simmer for 10 minutes.

Remove the mushroom stems. Serve in warmed soup bowls and garnish with thyme and red chilli flakes, if desired.

Tuesday, October 27, 2009

Waking Up on the Right Side of the Bed

oct27_01 copy

It never really occurred to me to make my own granola until now. Every couple of months, when I went through my box of granola, I would simply go to the store and pick up another box. It was fast and convenient. And sadly, that’s what the majority of consumers have accepted nowadays, the fact that it's convenient to get just about anything. Why bother to make your own, right? Well, for one thing, it’s so much healthier for you because you know what you’re putting into your food without all those additives and unnecessary fats and sugars. But more importantly, it’ll taste a thousand times better because you can never beat the taste of homemade.

A friend made some granola a few weeks back, which made me determined to make my own. I finally found some down time this weekend to make some hearty granola. I came across this recipe and thought it would make a great base for my granola. Let me just say how incredible your house will smell as the granola bakes. It’ll be hard to keep your fingers away from the granola as you take it from the oven and allow it to cool. Sprinkle over your morning yogurt, cottage or ricotta cheese, or ice cream, or pack a small handful to snack on in the afternoon.

oct27_02 copy

Hearty Granola
Adapted from Adventures in Shaw
Makes about 5 cups granola


3 cups oats (the large variety)
1 cup unsweetened coconut flakes, lightly toasted
½ to ¾ cup dried cherries, cut in half if large (or you can substitute dried cranberries)
1 cup raw pumpkin seeds
1 cup assorted nuts (whole almonds, walnuts, pecans), chopped
½ cup pure maple syrup
¼ cup olive oil
¼ cup packed light brown sugar
1 tsp kosher salt
½ tsp ground cinnamon
½ tsp ground cardamom
½ tsp ground nutmeg

Preheat oven to 300°F.

Spread coconut onto a baking sheet in a single layer. Toast the coconut in the oven until they start to turn a light golden brown. Keep a close eye on the coconut, since it’ll quickly take on colour the minute you turn away from it. Set coconut aside to cool.

In a large bowl, combine the oats, pumpkin seeds, nuts, spices, salt, and sugar. Stir everything together. Fold in the oil and syrup and stir until everything is evenly coated.

Spread the granola in a single on two non-stick baking sheets. Bake for 45 minutes, stirring every ten minutes, until golden. Remove sheets from oven and allow to cool thoroughly. Toss with the toasted coconut and dried cherries.

Sunday, October 25, 2009

A Little Self-Indulgence

oct25_01 copy

I don’t eat a lot of meat nowadays ever since I started to cut back on it two years ago, but if you were to ask me, lamb still remains one of my favourite meats out there. It’s incredibly tender and packed with so much flavour. After a long week and being forced to eat leftovers that I dug out from my freezer (which goodness knows how long they’ve been sitting in there…), I decided to give myself a little treat.

A few months ago, I made rack of lamb with a classic breadcrumb crust, but decided to change things up by using walnuts instead. It gives an equally crispy exterior, with a touch of sweetness from the walnuts, which is a nice balance to the saltiness of the mustard and the parmesan. Served the lamb on a bed of Swiss chard sautéed in olive oil, garlic and red chilli flakes, along with some rosemary potatoes that were roasting beside the lamb. Rack of lamb may seem daunting if you’ve never cooked it before, but it’s incredibly easy to make. So give this one a whirl for a fancy dinner that’ll surely impress your guests!

Walnut-Herb Crusted Rack of Lamb
Serves 2 to 3

1 cup walnuts
4 unsalted saltine crackers, crushed (or 4 tbsp breadcrumbs)
2 cloves garlic, crushed
4 tbsp fresh rosemary, leaves removed
4 tbsp fresh thyme, leaves removed
4 tbsp finely grated Parmiggiano-Reggiano
2 tbsp Dijon mustard
1 tbsp olive oil
Sea salt and freshly ground black pepper, to taste

Place walnuts, crackers, garlic, and herbs into the bowl of a food processor. Give the food processor a whirl until the nuts are a medium to medium-fine grind. Place nut mixture into a dish and stir in the Parmiggiano-Reggiano. Set aside.

Preheat the oven to 425°F.

Rinse the rack of lamb and pat dry with a paper towel. Score the layer of fat and season the lamb with salt and pepper. Heat the olive oil in a heavy pan over medium-high heat. Sear the lamb on all sides until brown all over.

Remove from the heat and brush with Dijon mustard. Press walnut mixture into the mustard-coated lamb, patting it down to ensure that it sticks to the meat and shaking off any excess nuts.

Bake in the oven for about 15 to 20 minutes for medium-rare, or until a meat thermometer reads 140-150°F.

Remove from the oven, cover with foil and let rest for 10 minutes to allow the juices to disperse throughout the meat again. Cut into individual chops and serve!

Thursday, October 22, 2009

The Tomato Toss

You know how you have those days where you get home after a long day and you don’t want to trouble yourself with dinner? Well, today was one of those days. I already had to suffer through a very uninspired lunch and when I opened up my fridge this evening, I was greeted with the same scarce-looking shelves that had stared back at me the day before while I was prepping lunch.

oct22_02 copy

Luckily, I still had some tomatoes still sitting around. Unlikely for me, if I didn’t use them soon (and I mean, soon), they were going to be tossed…out. So with the ones that were still salvageable, I threw together a quick sauce, which honestly, I love to do. It’s not only a great way to use up ingredients in your fridge, but you can have fun with spur-of-the-moment cooking. Best of all, it’s fast and on the table in minutes!

While the pasta is cooking, sauté diced tomatoes (seeds removed) with some minced garlic and olive oil, then add a splash of red wine and let it simmer down for a few minutes until the tomatoes start to break down and the skin softens. Sometimes I’ll add one or two anchovies and/or chilli flakes with the garlic to give some more flavour. Drain pasta when cooked through to your likeness. Add a splash of heavy cream to the sauce if you like, then toss the pasta until well coated. You can also toss other stuff like leftover roasted chicken, shrimp that you sautéed beforehand, sliced sausage, baby spinach...whatever floats your fancy. Toss in some of your favourite herbs and serve.

oct22_01 copy

The combinations are really endless, and that’s what’s fun about this simple tomato/garlic/olive oil base. You can do just about anything with it, and you’re bound to have a pasta dish that’ll taste different each time, but just as delicious!

Saturday, October 17, 2009

A Little Goes a Long Way

Thanksgiving is over and done with (at least in Canada), and I’m sure many of my fellow Canadians were dealing with the Thanksgiving aftermath this week: leftovers. We’ve got your classic turkey sandwiches—cold with some Swiss cheese and cranberry sauce, or hot and slathered in gravy—your turkey pot pies, the seemingly endless pumpkin pie…

oct17_01 copy

A little sure does go a long way with one can of pumpkin puree. I was able to squeeze out three different treats from the little can that could: last week’s pumpkin flan, pumpkin pancakes (a favourite of mine), and pumpkin muffins.

With a meeting first thing Thursday morning, I thought everyone could use a little sugar-boost at breakfast. Not to mention that muffins are one of the easiest things to transport around for someone who takes the public transit. This recipe is slightly tweaked from the pumpkin cupcakes I made last year and yields incredibly moist muffins (reminiscent of my carrot muffin recipe), but for some reason they didn’t taste quite the same as I remembered. That’s not saying much, since I do have pretty bad short-term memory, opted for vegetable oil instead of the flavour-boosting butter, and the lack of cream cheese frosting. I’d love the spices and the pumpkin flavour to stand out even more—either that, or it’s just my taste buds slowly going dull (I desperately hope it’s the former). This recipe is a great starting point though, and you can add raisins or dried cranberries to the batter, or sprinkle some pumpkin seeds on top to give it some more substance. I think the next time I’ll play around with some wheat bran as well, to make them even heartier, healthier and more flavourful.

oct17_02 copy

Pumpkin Muffins
Adapted from Martha Stewart
Makes 12

½ cup all-purpose flour
½ cup whole wheat pastry flour
½ tsp baking soda
½ tsp baking powder
½ tsp salt
¾ tsp ground cinnamon
½ tsp ground ginger
¼ tsp freshly grated nutmeg
¼ tsp ground allspice
¾ cup packed light brown sugar
½ cup vegetable oil
2 large eggs
8 ounces pumpkin puree
½ cup raisins or dried cranberries, soaked in boiling water for ½ hour and drained (optional)
½ cup chopped pecans or walnuts, toasted (optional)

Preheat oven to 350°F. Line muffin pans with paper liners and set aside. In a medium bowl, whisk together flour, baking soda, baking powder, salt, cinnamon, ginger, nutmeg, and allspice. Set aisde.

In a large bowl, whisk together oil, eggs, pumpkin puree and brown sugar. Add dry ingredients and whisk until smooth. Whisk in the raisins and pecans, if using.

Divide batter evenly among liners, filling each about halfway. Bake until tops spring back when touched, and a cake tester inserted in the centre comes out clean, about 20 to 25 minutes. Transfer to a wire rack and let cool completely.

Monday, October 12, 2009

A Thankful Weekend

There’s much for me to be thankful for this year: my wonderful, supportive parents and brother, my extended family, my friends who listen to me whine or make me laugh, that I’m done with school now, my new job, and the fact that my blog has made it to its 100th post today. It’s hard to fathom that this blog is still around. I started it as a hobby—a little something to do with my love for food and writing. So to all my readers out there, thanks for sticking around!

oct12_04 copy

My mom used to make turkey for Thanksgiving for my brother and I when we were kids, but as we grew older, the novelty of the turkey wore off, mostly because there were just less mouths and smaller appetites to feed. I stayed up late Friday night trying to finalize my Thanksgiving dinner menu by flipping through my numerous cookbooks and food magazines before I came across a recipe for a Garlic Roast Chicken in the September 2008 issue of delicious. My parents and I perused the market Saturday morning and they ended up buying a capon—turkey out, castrated male chicken in (which I had no clue was a capon until Saturday).

oct12_03 copy

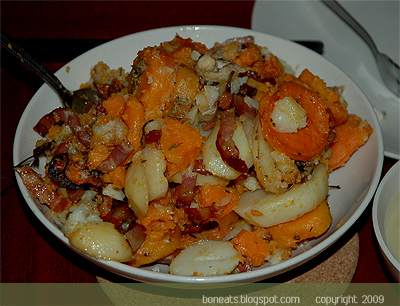
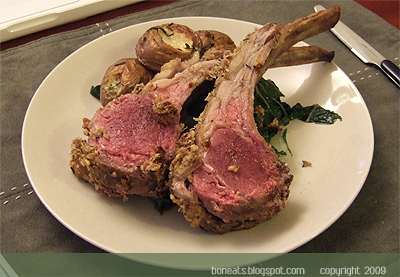
For a virgin bird-roaster, I was a little worried that I would either under-roast the bird and risk giving my parents salmonella poisoning, or end up with a really dry bird. But what I pulled out from the oven what a perfectly crisped and golden bird, with tender, juicy and super-moist meat underneath (including the breast!). The garlic and herb paste packed a huge flavour punch to the meat without being too overpowering, as well as helped keep the meat moist. Sweet potatoes and potatoes with pancetta and herbs roasted alongside the bird, which made the perfect accompaniment, along with some roasted beets and steamed green beans.

oct12_05 copy

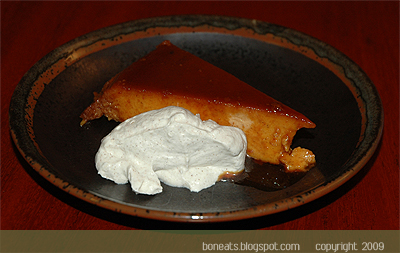
For dessert, the original plan was to make a pumpkin pie from scratch, but those plans were put on hold after a copy of Lucinda Scala Quinn’s Mad Hungry arrived on my desk. As I was flipping through the book (which is gorgeous and very well-written by the way), I came across a recipe for Pumpkin Flan (a.k.a. crème caramel) and thought it would be a great and easier alternative to pumpkin pie. Creamy and slightly sweetened, it’s the perfect ending to a Thanksgiving meal for anyone who’s looking for something other than pie.

Hope all my fellow Canadians had a great Thanksgiving, and are as equally stuffed as I am! I don’t think I’ll need to eat for the rest of the week!!

oct12_01 copy

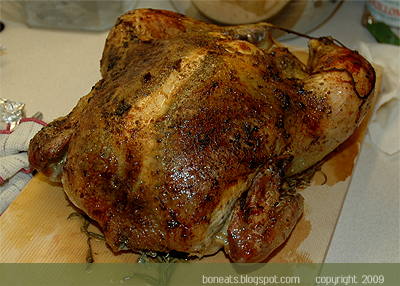
Garlic and Herb Roast Chicken with Pancetta, Rosemary and Thyme Potatoes
Adapted from delicious, September 2008
Serves 4


1 roasting chicken (about 3 to 4 lbs)
1 garlic bulb, peeled and separated into cloves
2 to 3 rosemary sprigs, leaves picked, plus 6 sprigs unpicked
2 to 3 thyme sprigs, leaves picked, plus 6 sprigs unpicked
1 small handful Italian (flat-leaf) parsley
Grated zest of 1 lemon, fruit quartered
35 g unsalted butter, softened
1 tbsp olive oil
Sea salt and freshly ground black pepper
1 kg potatoes (or a mix of potatoes and sweet potatoes), peeled and cut into ½-inch slices
150 g thickly sliced pancetta, cut into thin strips
1 ¼ cups dry white wine

For gravy:
2 tbsp all-purpose flour
Splash brandy, sherry or cognac
1 cup low-sodium chicken broth
Salt and freshly ground pepper, to taste

Preheat the oven to 400°F. Place potatoes and sweet potatoes in a large saucepan of cold salted water and bring to a boil. Reduce heat to medium and simmer for 5 minutes or until just tender. Drain and set aside.

Place the garlic, parsley, rosemary and thyme leaves, and lemon zest in a food processor. Add ½ teaspoon sea salt and process to a paste. Add the butter, olive oil and plenty of black pepper and process until well combined.

Rinse the chicken and pat dry with paper towel. Starting from the neck end, carefully slide your fingers underneath the skin to loosen it, working your way down to the thigh area, being careful not to tear the skin. Spread the garlic and herb paste between the flesh and the skin, smoothing it down and around the bird as far as you can—make sure you get plenty on the breast as this is the driest part. Tuck the lemon quarters and 3 sprigs each of rosemary and thyme into the cavity. Tie the legs together with kitchen twine, then tuck the wings under.

Layer potatoes, sweet potatoes, pancetta, rosemary sprigs and thyme sprigs in a roasting pan. Sit chicken on top, breast-side up, and pour over the wine. Season and roast for about 1 ½ hours, basting occasionally, until chicken is golden and the juices run clear when you prick the thickest part of the chicken thigh.

Remove the chicken to a cutting board, cover with aluminum foil and allow to rest for 10 minutes. Pour the pan drippings into a saucepan and return potatoes into oven to brown them some more (if desired) for about 5 to 10 minutes, increasing the temperature to 450°F.

Meanwhile, over medium heat, whisk in the flour. Add a splash of brandy. Slowly add the chicken broth, continuing to stir to incorporate the roux and to ensure the flour doesn’t burn. Increase the temperature to medium-high and allow the gravy to boil until thickened, about 5 minutes.

Carve the chicken, and serve with the gravy and potatoes.

Sunday, October 4, 2009

It Snows on the Moon

oct4_01 copy

It may be a little belated, but 中秋節/Happy Mid-Autumn Festival nonetheless. Mid-Autumn Festival was yesterday, and what a beautiful evening it was to enjoy the lovely full moon. And much like how the Americas have Thanksgiving, Mid-Autumn Festival is celebrated by the Chinese as a kind of harvest festival, where family members gather together to admire the harvest moon and eat (of course!).

Traditional mid-autumn foods include pomelo (a relative of the grapefruit), mini taros, starfruit, persimmons, and obviously, mooncake. I’ve never been a fan of them to be quite honest. Every year, my mom would buy a box, or we’d be gifted with one, and every year, I’d try my hardest to avoid eating them. In the end, I was always coaxed to nibble a small piece, in spirit of the festivities. But I always found them cloyingly sweet, I hated lotus seed paste, and the salted duck egg yolk in the centre didn’t help matters (it used to boggle my mind why they’d stick an egg yolk in there besides the fact that it’s supposed to represent the full moon).

oct4_02 copy

Back in the hey-day (and I’m talking about the days when my parents were kids), mooncakes, much like most Chinese pastries, were made with lard. Delicious? Yes. Friendly to one’s health? Not so much. Most mooncake producers use vegetable shortening nowadays, and stick with popular fillings like lotus seed paste (the most common) or red bean paste.

But over time, non-traditional mooncakes and fillings started to pop up on the market, with producers taking advantage of the commercial aspect of the festival (like any other holiday). While snowy mooncakes have apparently been around since the early 1980s, I don’t recall seeing them in North America’s Asian market until about the mid-1990s (and even if they were around before that, I would have been way too young to notice them). These mooncakes, as the name suggests, are chilled and usually offer more exotic and adventurous flavours, like mango, chocolate, strawberry, etc. Last year, I picked up a box of snowy mooncakes made by the Saint Honore company and really enjoyed them, so I decided to go with them instead (I’ve only been able to find two snowy mooncake brands in Toronto: this one and Maxim’s, which seem to have taken a fruitier approach to their flavours this year. Interesting, but a little too far out of the traditional box for me.) Again, Saint Honore did not disappoint, and the flavours, while not traditional, still adhered to some common Chinese ingredients that I’m quite familiar with and enjoy in Chinese desserts.

oct4_06 copy
Chestnut White Soybean Paste

oct4_04 copy
Black Sesame Pine Nut

oct4_05 copy
Pine Nut Green Bean Paste

oct4_03 copy
Pistachio Paste Red Bean

So if you’ve never tried snowy mooncakes, definitely buy a box and try them out next year. They’re quite different from your traditional mooncake, but they’re fun to eat, beautiful to look at, and allow you to still partake in the mid-autumn festivities!

  © Blogger templates 'Neuronic' by Ourblogtemplates.com 2008

Back to TOP