
Homemade Halloween Treats
If adults were allowed to go trick or treating, these are what I'd like to be getting in my loot bag.
Homemade candy. Like chocolate-covered sponge toffee. Or soft caramels. Or peanut butter cups.
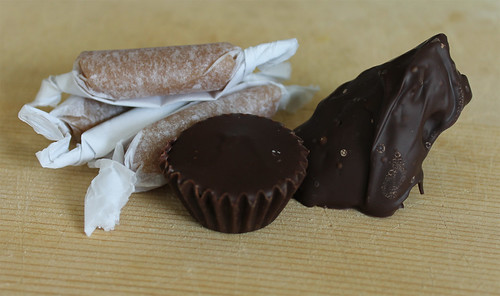
I made all three. And boy, were they good!
They were a far cry from the sad excuse of candy bars we gobbled down as kids, not knowing how to pronounce half the ingredients on the wrapper and being even more clueless as to how bad most of those ingredients actually were.
I haven't made a lot of candy and confection in my days, as it always seemed like an intimidating affair. All that hot sugar, if gone awry, can turn into pretty bad candy. But all you really need is a good candy thermometer and a dose of patience, and just about anyone can make their own sweet confections at home.
I loved those Kraft vanilla caramels as a kid. My parents used to buy a whole bunch and keep in them in a glass jar on top of a really high shelf to keep them out of my reach. To this day, they are still one of my guilty pleasures. There's something so satisfying and comforting about a soft, chewy caramel melting in your mouth (and getting stuck between your teeth), and its sweet caramel and vanilla flavours coating your tongue. So good.
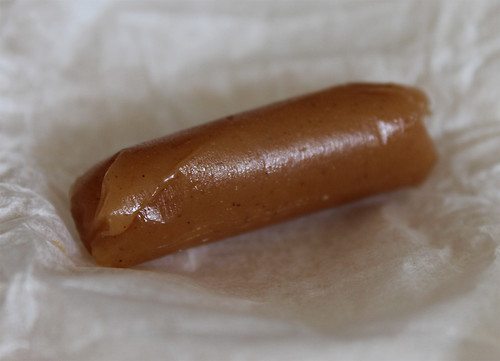
So when I came across this recipe for Pumpkin Spice Soft Caramels, I knew I had to make them. They were so incredibly easy to make and they did not disappoint—the perfect amount of softness and chew without the risk of taking out one of your fillings. I did learn that you have to wrap all of the caramels. I was too lazy to wrap the last few tidbits that I was going to save for myself and kept them in a container, only to find the next morning that they had "morphed" into one big blob.
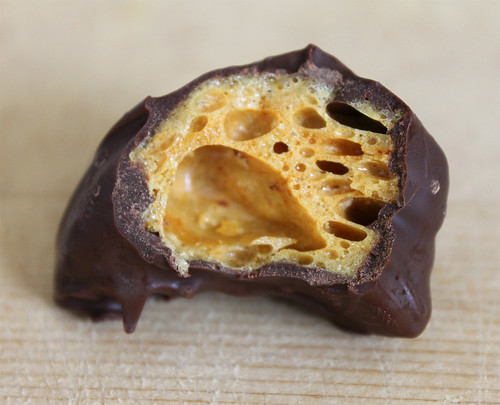
The sponge toffee were just as easy to make. It felt like being in science class all over again when I added the baking soda to the boiling sugar mixture and watched the mixture bubble up. The sponge toffee was a nice surprise—incredibly light yet crunchy with nice bubbles throughout. Dipped in some dark or semisweet chocolate and they become an awesome, homemade candy bar.
My favourite has got to be the peanut butter cups though. As a kid, I didn't like Reese's cups. I can't quite pinpoint why I didn't like them—maybe it was the texture or the taste, but I know I always traded all my Reese's cups with my brother. So I needed to make my own to see if it was just a dislike to the Reese's cups, or to peanut butter cups in general. Thankfully I discovered that it was just the former.
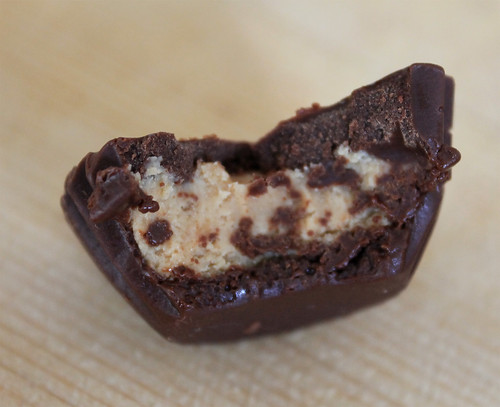
Rich, smooth, and velvety, the addition of a bit of crushed peanuts and graham crackers added just enough texture to the peanut butter centre without making it feel like you're eating sandpaper. The addition of peanut butter to the chocolate enhanced the peanut flavour in the chocolate, and helped keep the chocolate soft and smooth when set.
Chocolate Peanut Butter Cups
Adapted from Have Cake, Will Travel
Makes about 24 mini cups
284 g dark or semisweet chocolate, chopped
2 tablespoons smooth peanut butter
For the filling:
192 g smooth peanut butter
60 g powdered sugar
2 tablespoons graham cracker crumbs
2 tablespoons ground roasted peanuts
1/4 teaspoon sea salt
Melt chopped chocolate and 2 tablespoons peanut butter in a small heavy-bottom saucepan over a pot of simmering water, stirring often, until completely smooth. Immediately remove from heat.
Line a mini cupcake pan with 24 mini paper liners.
Spoon about 1 teaspoon of melted chocolate in one liner at a time. Using the back of a small spoon, coat the paper liner with the chocolate almost up to the very top, but not touching the top. Repeat until all the liners are coated. Refrigerate the pan for about 20 minutes, or freeze for about 10 minutes.
While the chocolate liners are setting, make the peanut butter filling. Combine the remaining ingredients in a bowl and stir until completely incorporated.
Take the cups out of the refrigerator or freezer, and spoon out about 1/2 tablespoon of the peanut butter filling. Again, use the back of a spoon to press the filling into each cup, making sure it gets into all the spaces, and gently flatten out the top.
Refrigerate the cups again. Gently reheat the melted chocolate over simmering water until just warm and runny again. Remove from the heat. Take out the cups from the refrigerator, then, one at a time, spoon 1 teaspoon of the melted chocolate on top of the peanut butter filling in the cup. Do not touch the melted chocolate once it’s on top. Once the whole pan has been filled, gently tap the pan on the counter two to three times to help the chocolate settle on top.
Refrigerate again for about 1 hour or until set. Or freeze for up to 30 minutes. Store chocolates in the fridge. While they can be eaten straight out of the fridge, you can also let them come to room temperature first before serving, about 10 to 15 minutes.


0 comments:
Post a Comment