Friday, August 22, 2008

A Taste of Japan

aug21_01 copy

August has been quite a busy month for me as I prepare for my big move, which also explains the lack of updates around here. From packing, to moving, to finalizing the little details, I haven't found much time to play around in the kitchen. However, it was time to get back into the kitchen for a break yesterday, where we prepared a simple and easy Japanese dinner.

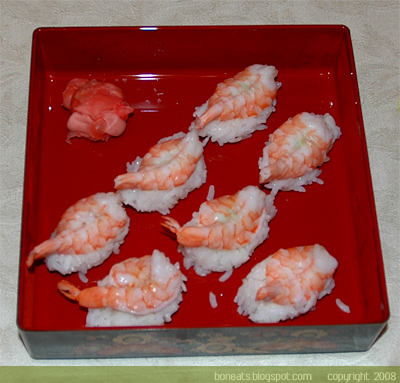
I used to think eels were disgusting and ugly (and if one needs to be reminded of this impression, please go watch Disney's The Little Mermaid again ^^). Well, to be honest, my opinion of them hasn't really changed much, but I do have a different perspective from a culinary perspective. Eel isn't a particular favourite in our family, mostly because my brother and I weren't such fans of it as children, and neither was my father, who disliked the fact that eel meat is riddled with many tiny, pin-like bones. The bones are indeed an annoyance, and can be a major turn-off to eating it. However, I've come to really like kabayaki-style unagi, filleted eel that is brushed with an incredibly delicious, sweet soy sauce-based glaze before being broiled on the grill and sometimes finished off with a sprinkle of toasted sesame seeds. Incredibly popular in Japan, it is often simply served over a bowl of steamed white rice, or made into hand-shaped sushi. We ended up rolling some into some sushi rolls, along with some cucumber and rolled egg. As Ross of Friends said, feel the power of unagi!

aug21_02 copy

aug21_03 copy

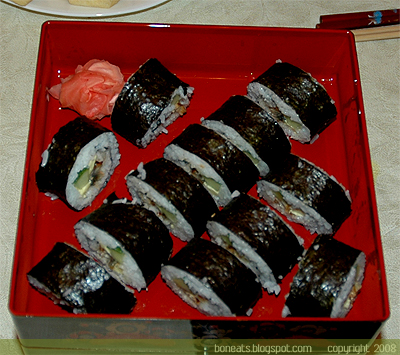
While my mom also fried off some Agedashi Tofu, deep-fried silken tofu that is topped off with bonito flakes, I also made Beef Tataki, seared raw beef. A thick piece of beef is seared in a hot pan on all sides until brown before the heat is turned off, then a bit of sake and soy sauce is sprinkled over the beef. The beef is then immediately covered by a lid and is cooked for another 5 to 7 minutes (depending on the thickness) on low heat. I probably could have taken my steak off the pan 2 minutes earlier, but despite being a little more overdone than what I would have liked, it was still delicious. The savoury glaze from the soy sauce and sake goes so nicely with silkiness of the meat. I can only imagine what this dish would be like with a glass of sake to go along with it!

aug21_05comb copy

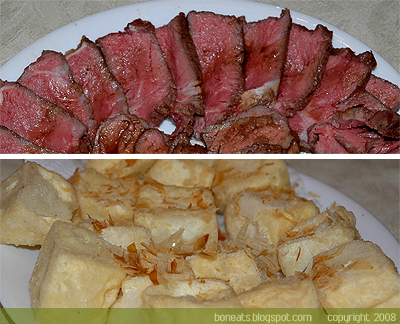
Lastly, I made chawanmushi, a classic, traditional steamed savoury egg custard. The eggs are stirred with soy sauce, sake (or mirin) and dashi stock added as flavourings, and usually consists of such fillings as gingko nuts, shiitake mushrooms, kamaboko (Japanese fish cake), shrimp and/or chicken. It looks lovely when you set some spring onions and some coloured kamaboko, cut into cute flower shapes, into the top layer of the custard. Our own pantry was a bit lacking, so we only used the white kamaboko, along with some shrimp and shiitake as fillings. Furthermore, we didn't have the traditional chawanmushi cups, which resembles Chinese tea cups with lids, so we steamed them in ramekins instead (and it works just as well!). The custard was extremely smooth, soft and extremely light. A great treat to end the evening!

aug21_06 copy

Monday, August 18, 2008

Il pane italiano

aug18_01 copy

Sometimes you need a quick, reliable recipe to turn to for a quick fix, and easy bread recipes like French Country Style or this Italian Bread is always my go-to for an easy and fast route towards good, homemade bread. While it is quick and easy, and uses ingredients that are usually readily available in one's pantry (more so with the French Country Style), it does require a bit of planning ahead since both recipes call for a poolish, or a starter, a kind of "cheater's" version to a sourdough starter. The minimum time requirement to allow a starter to ferment is usually 4 hours, but I usually like to stretch it out to up to 16 hours. Therefore, if you're thinking of making bread the next day, it's best to mix together the poolish ingredients the night before and let it do its thing overnight. Remember, the longer you let your poolish ferment, the greater you maximize the flavour of your bread.

What's interesting to this recipe is that it uses dry milk powder, an ingredient I've only used before in fat-enriched breads like the Milk Loaf. The addition of the milk powder also adds another dimension of flavour to the bread, along with the poolish. The resulting loaf is one with an incredibly crispy exterior, a fine crumb and a chewy texture. This is great sliced thickly and slathered with butter, and makes a great sandwich bread.

aug18_02 copy

Italian Bread
Adapted from The Fresh Loaf
Makes 2 medium loaves

Poolish
1/2 cup water, about 100°-115°F
1/2 cup bread flour
1/4 tsp dry active yeast

Dough
All of the preferment
2 1/2 cups bread flour, plus more as needed (up to 1/2 cup more)
1/4 cup nonfat dry milk powder
1/2 tbsp honey or brown sugar
1/2 tbsp salt
1 tsp dry active yeast
1/2 tbsp olive oil
1 cup water, about 100°-115°F

To start the poolish, mix together the flour, water, and yeast in a small bowl and cover with plastic wrap. Leave out at room temperature for at least 4 hours and as long as 16 hours.

To make the dough, dissolve the honey in the water, and then sprinkle the yeast over the water. Set aside for 10 minutes, or until foamy. Mix together the poolish, olive oil, salt, dry milk powder and yeast mixture in a bowl with 1/2 cup of flour. Mix thoroughly with a paddle attachment until creamy, about 1 minute. Mix knead in the rest of the flour a half a cup at a time until the dough starts to come away from the sides of the bowl. Switch to the hook attachment and knead in the remaining flour until you have a slack dough but one that is no longer sticky. Continue kneading until dough is smooth and elastic, about 10 to 15 minutes.

Place the dough in a well-greased bowl and cover with plastic wrap. Allow to rise at room temperature until at least 2 times in size, approximately 1 1/2 to 2 hours. Punch the dough down and let it rise again for half an hour.

Remove the dough from the bowl and divide it in half. Shape the dough into a ball or log, cover with a damp towel, and allow it to relax for another 20 minutes.

Shape the dough into its final shape. Cover again and allow to rise for another hour until doubled in bulk.

Meanwhile, preheat the oven and baking stone, if you are using one, to 475°F. Right before placing the loaves in the oven, score the top and brush or spray them lightly with water. Place them into the oven, immediately reduce the temperature to 425°F and bake for 15 minutes, spraying the loaves with water in 5 minute intervals for the first 15 minutes of baking. Rotate the tray and bake for another 5 to 10 minutes, or until the internal temperature of the loaf reads 200°F and sounds hollow when tapped from underneath. Reove from the oven and allow to cool on a baking rack for at least a half an hour before serving.

Saturday, August 9, 2008

Summer Plums

Berries, apricots, peaches, cherries…they’ve all had their share of the spotlight during the summer months. Now it’s time for the plum to shine, the fruit with the sweet flesh and tart skin. I used to love eating plums when they were really ripe, where the flesh was soft, the juices dripped down your hands when you took a bite into it and the flesh stained red from the dark pigment of the skin. Nowadays, I like to enjoy the fruit in its cooked form.

aug09_01 copy

Sometimes I just crave a quick sweet-fix, and that causes a problem when there are no cookies or cake lying around the house. Thus, it’s always a good idea to have a backup recipe that you can turn to in order to throw a few ingredients together for an instant dessert. A great way to make use of fresh summer fruits is to bake them in a pie, a tart or the much simpler crisp (also known as a crumble). What I love about the crisp is that, while it is very much like a pie, you don’t have to labour over the crust. The crunchy topping is simply a mix of flour, sugar, butter and any additional additives according to your own personal taste. I love the texture contrast you get in the end from a crisp: the warm, softened fruits with the crispy, crunchy topping. I love playing around with the textual components of the crisp topping. Sometimes I’ll use rolled oats, granola, cereal, nuts or dried fruits. For this crisp, I threw in some shredded coconut, which also adds a beautiful tropical scent and flavour to the plum crisp.

A crisp is such a warm, homey, comforting dish. Throw your ingredients together in a bowl and toss; spoon it into ovenproof bowls or dishes, and bake! This version is a bit tarter than others; serve it with some vanilla ice cream or sweetened whipped cream and it's perfect! Otherwise, you can always increase the amount of sugar to your taste.

aug09_02 copy

Summer Plum and Coconut Crisp
Adapted from Donna Hay Magazine, Issue 38
Serves 2 to 3


3 ripe but firm plums, pitted and chopped
2 to 3 tbsp brown sugar
¼ tsp ground cinnamon

Crisp topping
¼ cup flour
½ cup unsweetened shredded coconut
2 to 3 tbsp brown sugar
40 g unsalted butter, at room temperature

Preheat the oven to 350°F.

Place the flour, coconut and sugar in a bowl and mix to combine. Add the butter and use your fingertips or a fork to rub it into the flour mixture. Set aside.

Place the plums, brown sugar and cinnamon and toss to combine.

Spoon into two or three 1-cup capacity ovenproof dishes (ramekins are great!). Top with crisp topping and bake for 30 minutes or until golden. Serve with vanilla ice cream or whipped cream.

Friday, August 8, 2008

To A Dear Friend...

aug08_01 copy

It was my dear, dear friend's birthday last week, and although it comes a little late, we were finally able to get together and celebrate. I've known her for the majority of my life (since junior kindergarten), and we've shared so many fun and crazy memories over the years. While I've met and been acquainted with many other people over the years, she still remains my oldest and dearest friend, so I naturally had to bake her a little birthday treat.

I made a simple but classic Chocolate Layer Cake with Chocolate Buttercream. The cake recipe comes from Kate Zuckerman's The Sweet Life, a dessert cookbook that I'm in love with. The cake was easy to put together and baked beautifully. It's a nice dense cake that will hold well when you're making a multiple-layer cake, and it also retains its moisture really well. It's a fabulous base for any chocolate cake you might be making. The chocolate buttercream recipe I used comes from Williams-Sonoma. I was originally going to make the Milk Chocolate Ganache frosting that Zuckerman recommended with the cake, but I didn't have enough milk chocolate lying around the house. The chocolate buttercream is a nice alternative, giving the cake a richer chocolate taste due to the use of bittersweet chocolate.

aug08_02 copy

I'll admit, the cake doesn't look pretty or anything. I've never been great with cake decorating, and I would love to take a course on cake decorating some day in the future. But it does give it that homey, quirky look, which reflects both my personality and the relationship between my friend and I. Happy Birthday Kaela! To many more ugly but (hopefully) delicious cakes and memories!!!

  © Blogger templates 'Neuronic' by Ourblogtemplates.com 2008

Back to TOP